NSS Background Remover
How to remove a background from an image with NSS Background Remover
A complete walkthrough of NSS Background Remover: upload an image, let the on-device AI cut the subject, then either refine and export right on the tool page or open the full editor for layers, filters, upscaling, and more.
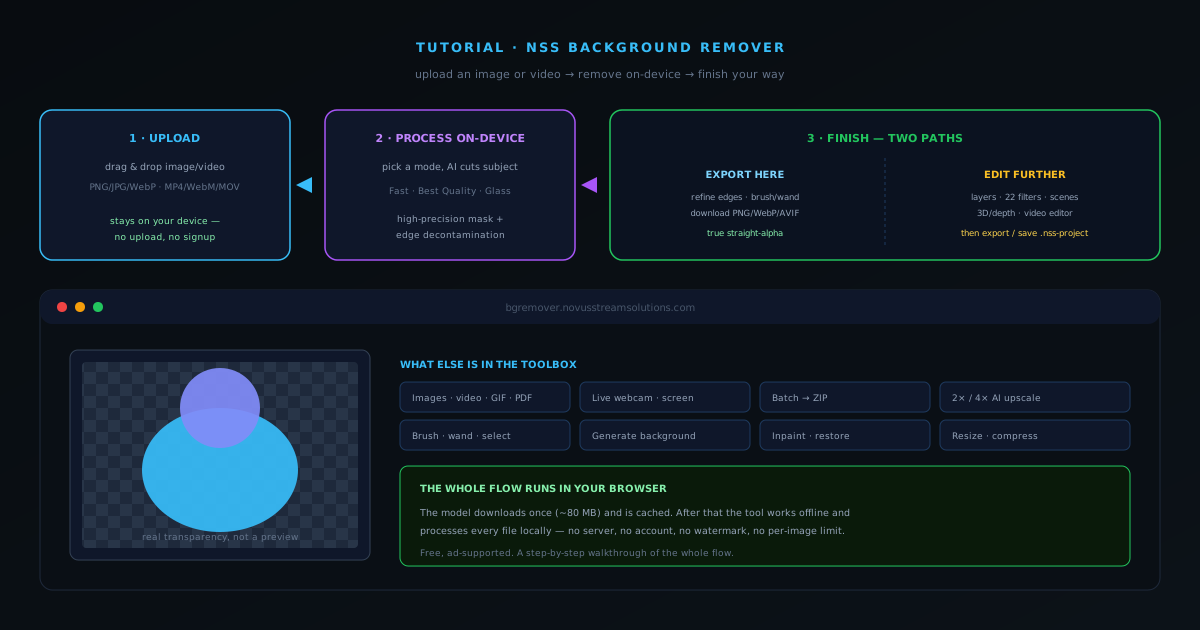
NSS Background Remover runs entirely in your browser. There is no signup, nothing to install, and your files are never uploaded to a server — the AI model downloads to your browser the first time you open the tool, and every image you process after that stays on your own device.
This walkthrough covers the core flow end to end: you upload an image, the tool removes the background on-device, and then you choose one of two finishes — export directly from the tool page, or open the result in the full editor to keep working. The same upload-process-finish pattern applies whether you are cutting out a single product photo or preparing one for a larger composition.
Contents
Two ways to finish
Quick export
Upload, let the AI cut the subject, do any quick edge cleanup, and download a transparent PNG/WebP/AVIF right from the tool page. Best for single product shots and clean subjects.
Edit further in the editor
Send the cutout into the full image editor for layers, filters, a 3D/depth preview, and 2×/4× AI upscaling — then export. Best when the cutout is one step in a larger composition.
- 1
1. Open the tool and drop in your image
Go to bgremover.novusstreamsolutions.com and open the image background remover. Drag and drop your photo onto the drop zone, or click to browse.
The first time the page loads it fetches the AI model into your browser cache (roughly 80 MB for the Fast model). That happens once — after it is cached the tool works offline, and nothing about your files leaves the device.
- Supported image inputs: PNG, JPG, WebP, AVIF (and HEIC).
- Images larger than 4096×4096 are processed from a downscaled copy and the mask is scaled back up — your full-resolution original is preserved.
- 2
2. Watch it load locally
The file is read locally — you will see it appear in the workspace without any upload progress bar, because there is no upload. Everything from here happens on your own device.
Working through several photos is just a matter of processing and exporting one, then dropping in the next; each stays entirely on your machine.
- 3
3. Pick a removal mode and let the AI process
Choose the model that fits your subject. Fast (RMBG-1.4) is a lightweight model that is excellent for product images, portraits, and subjects with clean edges. Best Quality (RMBG-2.0, a bilateral reference network) is built for fine detail — hair, fur, transparent objects, and complicated boundaries. There is also a Glass mode for tricky reflective and transparent material.
Processing happens on-device. The model produces a high-precision mask where every pixel keeps a smooth opacity value between fully opaque and fully transparent, then an automatic edge-decontamination pass removes color spill from the old background so your edges stay clean.
- Fast (RMBG-1.4): ~2–5 s per image on WebGPU, ~8–15 s on WebAssembly.
- Best Quality (RMBG-2.0 / BiRefNet): slower, but far better on hair and fine edges.
- Glass: tuned for transparent and reflective subjects.
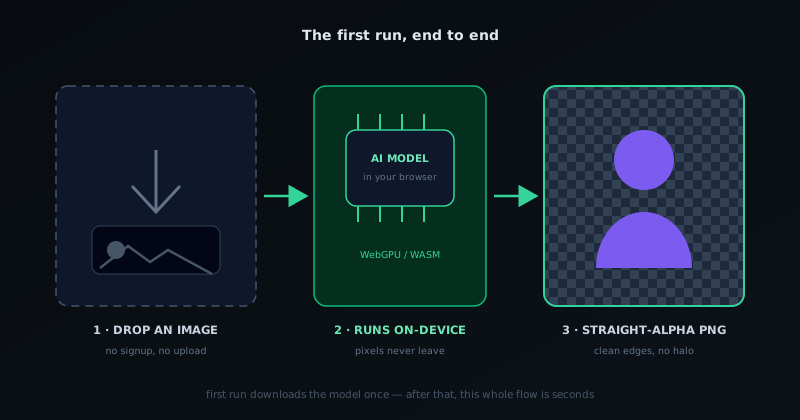
The whole first run in one picture: image in, on-device model, transparent PNG out. - 4
4a. Finish on the tool page — refine and export
If the cutout looks right, you can finish without leaving the tool. Use the brush, wand, and selection tools to paint back any detail the AI missed or erase a stray edge, then export. Exports are written as true straight-alpha files, so transparent PNGs open cleanly in Photoshop, Figma, and print software with no dark halo around the subject.
Choose your output format and download. This path is the fastest route for clean single subjects — many product shots need no manual cleanup at all.
- Refine tools: brush, magic wand, manual selection.
- Export formats: PNG, WebP, or AVIF (transparent).
- Straight (non-premultiplied) alpha keeps the original color of edge pixels intact.
- 5
4b. Or open the full editor to keep working
When the cutout is just one piece of a bigger image, send it into the full image editor. There you get multi-file layers with blend modes, 22 filters, a 3D preview with depth relief, and AI upscaling (2×/4×) to add resolution before you export.
When you are done you can export a flattened PNG/WebP/AVIF, or save the whole composition as a .nss-project file to pick back up later. Working with video instead? The separate video editor and video upscaler cover trimming, grading, filters, text, and 2×/4× enlargement.
- Image editor: layers, 22 filters, 3D preview + depth relief, 2×/4× upscaling.
- Video editor & video upscaler: trim, grade, filter, add text, and enlarge 2×/4×.
- Save as a .nss-project file to resume editing later.
Tips for the cleanest result
Reach for Best Quality whenever the subject has hair, fur, or semi-transparent material — the extra processing time is worth it on difficult edges. Keep originals high-resolution; the tool downscales internally if needed and scales the mask back up, so you lose nothing by starting large. And when a source image is too small to publish, run the 2×/4× AI upscaler before you export — it all stays local on your machine.
Frequently asked questions
Quick answers to common questions about this topic.
How do I remove a background from an image for free?
Open the NSS Background Remover, drop in your image, and the AI removes the background automatically in your browser. Export a transparent PNG — it is free, needs no account, and nothing is uploaded.
What can I do after removing the background?
Export a transparent PNG straight away, or open the cutout in the full image editor for layers, filters, a 3D/depth preview, and 2×/4× AI upscaling — all on-device.